19 Jul How to Get Started on your First Mural – Tips and Tricks
The first thing to think about is the space and light in the area you want to create the mural.
It is important that the subject matter suits the environment, for example something bright with
lots of movement might be better suited to a hall which is passed through rather than a sitting
room in which more time is spent.
The area you are going to paint the surface should be prepared, made smooth and painted in
water based paint. I personally prefer a slight sheen of eggshell, but equally many mural artists
paint over washable matt.
Having determined the area you need to find reference material which could be just one image,
maybe a personal photo of a scene or something you have seen in a magazine which inspires
you, or a series of images for example you could add birds or objects to make a very personal
original mural.
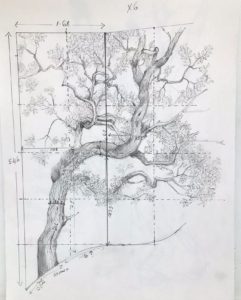
The traditional way to plan a mural is for the mural artist to do a scaled sketch first. It is much
easier to change and work on a small scale, one tip is to trace the scene/objects having printed
them out to scale first, this gives you a more accurate base to start the mural.
Once the drawing is complete check the measurements, one more tip having measured the wall
and for example it is 120cm x 240cms is to make the drawing either the same in mm for
example the drawing is 120mm x 240mm, if this is too small double it 240mm x 480mm.
The next step is to divide the drawing up into squares which will be reproduced on a larger scale
on the wall where the mural will be painted.
Depending on the level of detail needed relates to how small the squares for example they
could be 20 mm in the drawing and 20cm on the wall or double that size or a mixture of the two,
this method has been used for a long time.
Previous to this in the 16th century the renaissance artists would draw the figures to the true
size on the ground on appropriate paper and place pin pricks on the lines over which colourd
chalk would be tapped over the pin pricks when the cartoon is in place on the wall or ceiling.
Once you have a working drawing of the mural on the wall, the fun part begins, yes the painting.
Practically all muralists use acrylic paints for quick drying time and a more healthy environment
for the mural painter and the client.
I would advise whilst practising to buy medium quality paints, student quality and above, cheap
paints do not have the pigment strength to cover well. Cover the floor with plastic sheets/dust sheets.
Each artist has a different working method. I start with the sky or background ,it is easier to paint
over afterwards. I generally use a large tray with titanium white, ceruleum blue and cobalt blue
with a small amount of paynes grey, using burnt sienna with blue is another way to get a warm
grey for the underparts of the clouds.
I use a large brush and blend from darker cobalt gradually introducing white and ceruleum as
the sky lightens on the way down, adding clouds and maybe warmer colours (raw sienna).
Once this is done you can start on the other contents of the mural, another tip is to use a glaze
to soften the areas in the background to create greater depth.
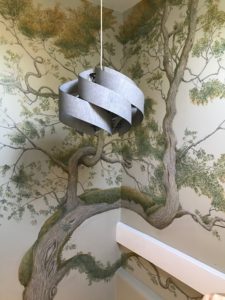
Alternatively the background can be left plain as I have chosen to do in the mural with a giant
tree covering 5 metres going up two flights of a hallway.
No Comments